My guitar design has its roots back when I was a teenager when, for my 18th birthday, I persuaded my mum to finance a self-build project. I didn’t actually build it completely from scratch, just from parts, painting the body, lacquering the neck, bolting it all together, attaching the hardware and wiring up the pickups etc. But despite not actually carving any wood, I learned a lot about how guitars are built (expanding on my previous experience a few years before of putting together a Strat-style guitar) and was very happy with the result – a lovely metallic British Racing Green Telecaster-style guitar, loaded with Seymour Duncan humbuckers, locking machine-heads, the works… Plus it had my name on the headstock, instead of that other one beginning with the letter F…
Some months later, I flew to the States to visit my dad and decided to take the guitar to show him (he is also a guitarist). Knowing that I probably wouldn’t be allowed to take it on board with me – and not wanting to risk trying and then having to check it into the hold in a gig bag – I went out and bought a proper hard-shell flight case.
The outbound flight went without a hitch and my guitar arrived safe and sound. No such luck on the way back… Having retrieved my suitcase from the baggage carousel, I waited for my guitar…
And waited… and… waited…
Starting to get a little worried at this point… A little bit longer…
Ah, here it comes…
Oh.
That’s just the flight case lid.
O…. K….
Panicking just slightly now.
Something else coming out… Great… Just great. It’s the other half of the flight case.
No sign of the guitar… You can imagine what’s going through my mind at this point.
And then… finally! Here it comes – I see the headstock slowly emerging up the conveyor belt onto the carousel, followed by the neck… Minor heart attack while I wait to see if the body is still attached… Yes, it is. Phew!
Any damage? Hmmm… looks like just a few scratches – annoying, but nothing serious.
So thankfully my guitar survived its ordeal (and the airline did at least eventually pay for a new flight case, though no compensation for the damaged paintwork, never mind emotional distress 😉
But the experience got me thinking – it must be possible to design a guitar that’s small enough to take in an aircraft cabin but doesn’t require any compromise in playing style, sound, aesthetics or quality. I started looking into what was out there – for example, the Steinberger headless guitars and the cheaper Hohner copies looked like a promising option – but I struggled to find anything that did not involve at least some compromise.
Headless guitars require a change of approach since the tuners are at the other end of the guitar – not necessarily a problem, but not what I wanted. Plus the ‘cricket bat’ ones were, in my opinion, just plain ugly. Another option involved either shrinking everything, notably the scale length, to create a ‘baby’ guitar – fine for young kids, maybe, but I didn’t want to have to adjust my fretting style whenever I switched between a ‘travel’ guitar and a ‘proper’ guitar. On top of that, everything marketed as a travel guitar seemed to be cheap and cheerful, with pretty basic quality or gimmicks like built-in speakers that, while good for practicing on the road, wouldn’t make the guitar much use on stage or in the studio. And, while I acknowledge that this is entirely subjective, most of what I saw was, to be honest, pretty ugly…
So I decided I’d have a go at designing one myself. I started thinking about how a guitar could be made to be as short as possible while still keeping a ‘full-size’ scale length and regular tuning pegs, and while still looking like a traditional electric guitar.
The obvious starting point was to get rid of all that wood behind the bridge. It’s a holdover from acoustic guitars, where the body shape is a fundamental part of the guitar’s sound; on an electric guitar, in my view, it doesn’t really do a whole lot in terms of the sound and only really serves to provide balance – something that is easily fixed by adjusting the length of the top horn.
So that, pretty much, is how I came up with the body shape – lose everything behind the bridge and extend the top horn forward to provide the balance. The cutaways came about simply to provide full access to the upper frets. The rest was just a case of smoothing out the curves so that the lower bout would fit neatly over my leg if I wanted to play seated and the upper bout would tuck in under my ribs.
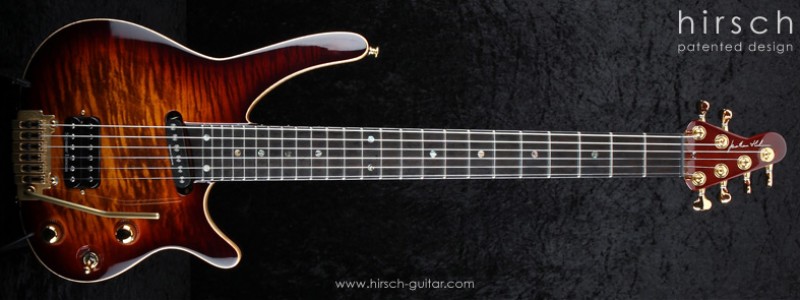
The two-plus-four headstock arrangement was the result of wanting to keep the headstock as small as possible and have the strings run in a straight line from bridge saddle to nut to tuning peg. I reversed the headstock because I wanted slightly less tension on the upper strings. The decision not to go with a three-plus-three arrangement was really just aesthetic – I didn’t want an arrow-shaped headstock…
Over the course of a summer, while back at my mum’s for the holiday before going back to university, with drawings spread out all over her kitchen table, the design started to take shape, culminating in an actual-size blueprint, that spent the rest of the year pinned to my bedroom wall. It would be another five years before I was in a position to actually get it built…